pip show which version is available

Show versions of an pip package you did not install. For example i want to install the latest 2.9 major release of ansible, seems to be 2.9.17.

Normally „pip3 install package==version“ installed the version you define. With an not existing version like „randomword“ you get:

pip3 install ansible==randomword


ERROR: Could not find a version that satisfies the requirement ansible==randomword (from versions: 1.0, 1.1, 1.2, 1.2.1, 1.2.2, 1.2.3, 1.3.0, 1.3.1, 1.3.2, 1.3.3, 1.3.4, 1.4, 1.4.1, 1.4.2, 1.4.3, 1.4.4, 1.4.5, 1.5, 1.5.1, 1.5.2, 1.5.3, 1.5.4, 1.5.5, 1.6, 1.6.1, 1.6.2, 1.6.3, 1.6.4, 1.6.5, 1.6.6, 1.6.7, 1.6.8, 1.6.9, 1.6.10, 1.7, 1.7.1, 1.7.2, 1.8, 1.8.1, 1.8.2, 1.8.3, 1.8.4, 1.9.0.1, 1.9.1, 1.9.2, 1.9.3, 1.9.4, 1.9.5, 1.9.6, 2.0.0.0, 2.0.0.1, 2.0.0.2, 2.0.1.0, 2.0.2.0, 2.1.0.0, 2.1.1.0, 2.1.2.0, 2.1.3.0, 2.1.4.0, 2.1.5.0, 2.1.6.0, 2.2.0.0, 2.2.1.0, 2.2.2.0, 2.2.3.0, 2.3.0.0, 2.3.1.0, 2.3.2.0, 2.3.3.0, 2.4.0.0, 2.4.1.0, 2.4.2.0, 2.4.3.0, 2.4.4.0, 2.4.5.0, 2.4.6.0, 2.5.0a1, 2.5.0b1, 2.5.0b2, 2.5.0rc1, 2.5.0rc2, 2.5.0rc3, 2.5.0, 2.5.1, 2.5.2, 2.5.3, 2.5.4, 2.5.5, 2.5.6, 2.5.7, 2.5.8, 2.5.9, 2.5.10, 2.5.11, 2.5.12, 2.5.13, 2.5.14, 2.5.15, 2.6.0a1, 2.6.0a2, 2.6.0rc1, 2.6.0rc2, 2.6.0rc3, 2.6.0rc4, 2.6.0rc5, 2.6.0, 2.6.1, 2.6.2, 2.6.3, 2.6.4, 2.6.5, 2.6.6, 2.6.7, 2.6.8, 2.6.9, 2.6.10, 2.6.11, 2.6.12, 2.6.13, 2.6.14, 2.6.15, 2.6.16, 2.6.17, 2.6.18, 2.6.19, 2.6.20, 2.7.0.dev0, 2.7.0a1, 2.7.0b1, 2.7.0rc1, 2.7.0rc2, 2.7.0rc3, 2.7.0rc4, 2.7.0, 2.7.1, 2.7.2, 2.7.3, 2.7.4, 2.7.5, 2.7.6, 2.7.7, 2.7.8, 2.7.9, 2.7.10, 2.7.11, 2.7.12, 2.7.13, 2.7.14, 2.7.15, 2.7.16, 2.7.17, 2.7.18, 2.8.0a1, 2.8.0b1, 2.8.0rc1, 2.8.0rc2, 2.8.0rc3, 2.8.0, 2.8.1, 2.8.2, 2.8.3, 2.8.4, 2.8.5, 2.8.6, 2.8.7, 2.8.8, 2.8.9, 2.8.10, 2.8.11, 2.8.12, 2.8.13, 2.8.14, 2.8.15, 2.8.16rc1, 2.8.16, 2.8.17rc1, 2.8.17, 2.8.18rc1, 2.8.18, 2.9.0b1, 2.9.0rc1, 2.9.0rc2, 2.9.0rc3, 2.9.0rc4, 2.9.0rc5, 2.9.0, 2.9.1, 2.9.2, 2.9.3, 2.9.4, 2.9.5, 2.9.6, 2.9.7, 2.9.8, 2.9.9, 2.9.10, 2.9.11, 2.9.12, 2.9.13, 2.9.14rc1, 2.9.14, 2.9.15rc1, 2.9.15, 2.9.16rc1, 2.9.16, 2.9.17rc1, 2.9.17, 2.10.0a1, 2.10.0a2, 2.10.0a3, 2.10.0a4, 2.10.0a5, 2.10.0a6, 2.10.0a7, 2.10.0a8, 2.10.0a9, 2.10.0b1, 2.10.0b2, 2.10.0rc1, 2.10.0, 2.10.1, 2.10.2, 2.10.3, 2.10.4, 2.10.5)
ERROR: No matching distribution found for ansible==randomword

GS5 FreeSWITCH PBX hat nun MIT Lizenz

Mit Freude habe ich heute beim Stöbern entdeckt, das die Firma Amooma die aktuelle Version von Gemeinschaft (GS5) am 27.12.2013 unter die MIT Lizenz gestellt hat.

Vielen Dank dafür! Mehr zu Gemeinschaft 5 unter http://amooma.de/gemeinschaft/gs5

Commit von Stefan Wintermeyer zur Lizenz-Änderung.

Hauptunterschiede zwischen GS3 und GS5:

  • Umstieg von Asterisk auf FreeSWITCH (SIP-Server, B2BUA) und Kamailio (SIP-Proxy).
  • Komplett neue WebGUI (früher PHP basiert, jetzt Ruby on Rails basiert).
  • Wegfall von ISDN-Karten Unterstützung es werden dafür Mediagateways oder professionelle SIP-Provider empfohlen.
  • Lizenz nun MIT, bedeutet das Änderungen (keine Configänderungen, sondern Programmänderungen) aktiv dem Projekt zurückgegeben werden müssen.


centos – Welches Repro hält welche Version eines Pakets bereit

Das Beste ist natürlich wenn man von Systemkritischen Paketen ein eigenens Repro hat und dann dort nach und nach Updates einspielt. Vorher hat man diese optimalerweise in einem Staging Verfahren getestet (dev -> test -> produktion).

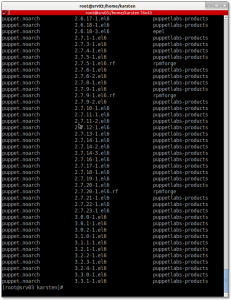
Um auf die Schnelle aus verschiedenen aktivierten Repros herauszufinden, welches Repro welche Version bereitstellt ist die Option „–showuplicates“ sehr angenehm.

yum list available --showduplicates packagename

Kann dann für z.B. puppet aus den Repros EPEL (alt), RPMForge (2.7.x) und YUM.PuppetLabs.com so aussehen:

Console_yum_list_available_showduplicates

Make FreeSWITCH alphanumeric Users not case sensitive

If you come from kamailio and transfer your setup to FreeSWITCH as SBC you can run into trouble cos kamailio is not case sensitive but FS is.

So sip:user1@FS-Box is not the same as sip:UsEr1@FS-Box.
Here is a solution to fix that and make FreeSWITCH not case sensitive.

First your directory/default/user1.xml needs to force the sipusername to lowercase. sip-force-user did the trick for us. Here an Example:

<include>
  <user id="user1">
    <params>
      <param name="password" value="secretpass"/>
    </params>
    <variables>
      <variable name="sip-force-user" value=user1"/>
      <variable name="toll_allow" value="domestic,international,local"/>
      <variable name="accountcode" value="user1"/>
      <variable name="user_context" value="default"/>
      <variable name="effective_caller_id_name" value="user1/>
      <variable name="effective_caller_id_number" value="user1"/>
      <variable name="outbound_caller_id_name" value="$${outbound_caller_name}"/>
      <variable name="outbound_caller_id_number" value="$${outbound_caller_id}"/>
    </variables>
  </user>
</include>

Then your dialplan extension should match User1 or user1 or UsEr1 – (?i) mades the condition match incasesensitve for you. For example dialplan/default/user1.xml. Hardwired is the lowercase dialed_extension – so it matches with the lowercase registration.

<extension name="user1">
    <condition field="destination_number" expression="^(?i)(user1)$">
        <action application="export" data="dialed_extension=user1"/>
        <action application="set" data="ringback=${de-ring}"/>
        <action application="set" data="transfer_ringback=$${de-ring}"/>
        <action application="set" data="hangup_after_bridge=true"/>
        <action application="set" data="continue_on_fail=false"/>
        <action application="bridge" data="sofia/external/${dialed_extension}%${domain_name}"/> 
      </condition>
</extension>

Thats all. Alternativ you can use in the sip_profile the option
<param name=“inbound-reg-force-matching-username“ value=“true“/>
That force Contact must match Username on register. Tested with FS 1.2.1

LVM Volume aus KVM Image mounten

srv01# losetup /dev/loop0 /var/lib/libvirt/images/vmFSvm-rails.qcow2
srv01# kpartx -av /dev/loop0
add map loop0p1 (253:0): 0 497664 linear /dev/loop0 2048
add map loop0p2 (253:1): 0 41439234 linear /dev/loop0 501758
add map loop0p5 : 0 41439232 linear 253:1 2

srv01# fdisk -lu /dev/loop0

Disk /dev/loop0: 21.5 GB, 21474836480 bytes
255 heads, 63 sectors/track, 2610 cylinders, total 41943040 sectors
Units = sectors of 1 * 512 = 512 bytes
Sector size (logical/physical): 512 bytes / 512 bytes
I/O size (minimum/optimal): 512 bytes / 512 bytes
Disk identifier: 0x000412e5

Device Boot Start End Blocks Id System
/dev/loop0p1 * 2048 499711 248832 83 Linux
/dev/loop0p2 501758 41940991 20719617 5 Extended
/dev/loop0p5 501760 41940991 20719616 8e Linux LVM
srv01# lvdisplay
— Logical volume —
LV Path /dev/rails/root
LV Name root
VG Name rails
LV UUID sNfv19-M132-gVTb-2o2D-rmx8-YG0g-uSK2xE
LV Write Access read/write
LV Creation host, time ,
LV Status NOT available
LV Size 18,88 GiB
Current LE 4833
Segments 1
Allocation inherit
Read ahead sectors auto

— Logical volume —
LV Path /dev/rails/swap_1
LV Name swap_1
VG Name rails
LV UUID cdzPoA-KgTU-Ds02-prP2-nGJO-0yNZ-FCOVHA
LV Write Access read/write
LV Creation host, time ,
LV Status NOT available
LV Size 884,00 MiB
Current LE 221
Segments 1
Allocation inherit
Read ahead sectors auto

srv01# vgchange -a y
2 logical volume(s) in volume group „rails“ now active
srv01# lvdisplay
— Logical volume —
LV Path /dev/rails/root
LV Name root
VG Name rails
LV UUID sNfv19-M132-gVTb-2o2D-rmx8-YG0g-uSK2xE
LV Write Access read/write
LV Creation host, time ,
LV Status available
# open 0
LV Size 18,88 GiB
Current LE 4833
Segments 1
Allocation inherit
Read ahead sectors auto
– currently set to 256
Block device 253:3

— Logical volume —
LV Path /dev/rails/swap_1
LV Name swap_1
VG Name rails
LV UUID cdzPoA-KgTU-Ds02-prP2-nGJO-0yNZ-FCOVHA
LV Write Access read/write
LV Creation host, time ,
LV Status available
# open 0
LV Size 884,00 MiB
Current LE 221
Segments 1
Allocation inherit
Read ahead sectors auto
– currently set to 256
Block device 253:4

srv01# mount /dev/rails/root /media/rails_root

srv01# umount /media/rails_root
srv01# vgchange -an
0 logical volume(s) in volume group „rails“ now active
srv01# lvdisplay
— Logical volume —
LV Path /dev/rails/root
LV Name root
VG Name rails
LV UUID sNfv19-M132-gVTb-2o2D-rmx8-YG0g-uSK2xE
LV Write Access read/write
LV Creation host, time ,
LV Status NOT available
LV Size 18,88 GiB
Current LE 4833
Segments 1
Allocation inherit
Read ahead sectors auto

— Logical volume —
LV Path /dev/rails/swap_1
LV Name swap_1
VG Name rails
LV UUID cdzPoA-KgTU-Ds02-prP2-nGJO-0yNZ-FCOVHA
LV Write Access read/write
LV Creation host, time ,
LV Status NOT available
LV Size 884,00 MiB
Current LE 221
Segments 1
Allocation inherit
Read ahead sectors auto

srv01# kpartx -dv /dev/loop0
srv01# virsh start vm-rails
Domain vm-rails started

nginx als reverse proxy vor apache2 mit froxlor

nginx ist ein kleiner hochperformanter Webserver und Proxy für http, pop3 und imap.

Dieser Artikel basiert auf dem help.ubuntu.com Eintrag Nginx/ReverseProxy.

Nginx Installation auf Debian Systemen:

sudo apt-get install nginx

Nginx Proxy Configuration (nur reverse, kein caching Proxy). Diese unter /etc/nginx/proxy.conf speichern.

proxy_redirect off;
proxy_set_header Host $host;
proxy_set_header X-Real-IP $remote_addr;
proxy_set_header X-Forwarded-For $proxy_add_x_forwarded_for;
client_max_body_size 10m;
client_body_buffer_size 128k;
proxy_connect_timeout 90;
proxy_send_timeout 90;
proxy_read_timeout 90;
proxy_buffers 32 4k;

Nginx vhost Vorlage für Froxlor Domains, speichern unter /etc/nginx/TEMPLATE:

server {
listen 80;
server_name DOMAIN www.DOMAIN;
access_log /var/log/nginx/DOMAIN.access.log;
location / {
proxy_pass http://127.0.0.1:8888;
include /etc/nginx/proxy.conf;
}
}

Unter server_name werden die Froxlor Domains eingetragen, dazu gibt es gleich ein Script. proxy_pass verweisst auf die Apache2 Instanz, die hier unter 127.0.0.1 Port 8888 erreicht wird.

Froxlor Domains aus der MySQL Datenbank abfragen und als nginx vhosts speichern unter /etc/nginx/CREATE_VHOSTS:


DOMAINS=/etc/nginx/domainlist.txt
USE froxlor ; SELECT domain FROM panel_domains;
MYSQL

for domain in `cat $DOMAINS`
do
# echo $domain
sed s/DOMAIN/$domain/g /etc/nginx/TEMPLATE >/etc/nginx/sites-enabled/$domain
done

Domains auslesen und Vhosts schreiben:

sh /etc/nginx/CREATE_VHOSTS

Apache und Froxlor Configuration:

sudo apt-get install libapache2-mod-rpaf

Damit die wirkliche remote IP Adresse im Apache Logfile landet, muss das Apache2 mitgeteilt werden. In Froxlor wird unter SERVER > IPs and Ports > bearbeiten > Webserver domain config folgendes eingetragen:


<ifmodule mod_rpaf.c>
RPAFenable On
RPAFsethostname On
RPAFproxy_ips 83.151.25.150
</ifmodule>

RPAFproxy_ips sind die nginx IP Adressen, meist also die public IP. Mehreinträge sind möglich.

Proxy und Webserver neustarten:

invoke-rc.d nginx reload
invoke-rc.d apache2 reload

Trixbox v2.6.2.3 und Sipgate Account

Da ich heute abend einen Fli4l Teamkollegen bei seiner ersten Trixbox geholfen habe, schnell das erfahrene niederschreiben :). Wichtig ist der Context „from-pstn“ in den Peer Details, sonst landen die eingehende Rufe irgendwo und werden mit „Dieser Anschluss ist vorrübergehend nicht erreichbar“ abgelehnt. Eine Inbound Route sollte auch gesetzt sein.

switch user -> dann Benutzer maint mit Passwort password

Unter „Trunks“ erstellen man einen „Sip Trunk“.

Wenn 1234567 der Username bei Sipgate ist, sowie 055511155555 die Rufnummer diesen wie folgt hinterlegen:


Outbound Caller ID: 1234567

PEER Details:
host=sipgate.de
domain=sipgate.de
username=1234567
fromuser=1234567
fromdomain=sipgate.de
secret=SEHRGEHEIM
type=peer
insecure=invite
canreinivite=no
disallow=all
allow=alaw
nat=no
context=from-pstn
; qualify=yes

Registration
Register String:

1234567:SEHRGEHEIM@sipgate.de/055511155555

Intel D945GCLF und Realtek r8101.ko BUG: soft lookup- CPU#1 stuck for 11s! halt:7887]

Diese formschöne Fehlermeldung erhält man mit dem Intel Atom Barebone Board D945GCLF Chipsatz. Ich habe gerade Ubuntu 8.04.1 aka Hardy am Wickel. 2.6.24-23-generic Kernel.

Man kann sich zwischen verschiedenen BUGs entscheiden. Der r8169 Treiber verursacht „dropped“ Packets laut ifconfig, segfaultet auch gern bei der Installation:

eth0      Link encap:Ethernet  Hardware Adresse 00:1c:c0:8d:c9:2d
inet Adresse:192.168.200.136  Bcast:192.168.200.255  Maske:255.255.255.0
inet6-Adresse: fe80::21c:c0ff:fe8d:c92d/64 Gültigkeitsbereich:Verbindung
UP BROADCAST RUNNING MULTICAST  MTU:1500  Metrik:1
RX packets:3261 errors:0 dropped:4143098811 overruns:0 frame:0
TX packets:3198 errors:0 dropped:0 overruns:0 carrier:0
Kollisionen:0 Sendewarteschlangenlänge:1000
RX bytes:3130291 (2.9 MB)  TX bytes:606778 (592.5 KB)
Interrupt:220 Basisadresse:0x2000

Also den r8101.ko Treiber installieren vom Netzwerkkartenhersteller Realtek. Dieser Segfaultet nicht beim Starten des Rechners. Dafür hängt er beim Runterfahren des Rechners mit der Fehlmeldung

„BUG: soft lockup – CPU#1 stuck for 11s! [halt:7887]“

Hierzu gibt es bereits ein Bugreport. Als Workaround habe ich erstmal r8101.ko geblacklistet. Damit mir r8169.ko nicht einfach so abschmiert habe ich dbus-daemon deaktiviert. Ähnliche Probleme werden auch mit.

http://www.greenwireit.com/blog/2009/02/nc91-230-lf-progress-update-linux-issues/

Eine mögliche Lösung dieses Problems besteht in einen Kernelpatch wie http://linuxtrek1.blogspot.com/2008/10/ubuntu-on-intel-d945gclf-with-intel.html beschrieben.